Monday, December 29, 2008

Cranberry Vanilla Muffins


I introduced my family to Beets and Bonbons this weekend (hi, everyone!) and I think I have a whole new audience.

This recipe comes from my mom and has been a Thanksgiving staple for as long as I can remember. It was probably the only cooking I ever did while growing up, and I looked forward to my role every year. At our house, the muffins are served as a side to the Thanksgiving feast, and double as a delicious breakfast the next morning.

Cranberry Vanilla Muffins
(from "Cold Weather Cooking" by Sarah Leah Chase)

Batter

1/2 vanilla bean, cut into small pieces
1 C sugar
1/2 C (1 stick) unsalted butter
2 large eggs
2 C unbleached all-purpose flour
2 tsp. baking powder
1/4 tsp. salt
1/2 C milk
2 1/2 cups fresh cranberries, coarsely chopped


Topping

2 Tbs. sugar
1/2 tsp. grated nutmeg

1. Preheat oven to 375 degrees F. Line 12-14 muffin cups with paper liners.

2. Prepare the batter: Place the vanilla bean and sugar in a blender or food processor and process until the vanilla bean is ground to tiny flecks.

3. Using an electric mixer, cream the vanilla sugar with the butter in a mixing bowl until smooth. Add the eggs one at a time, beating well after each addition.

4. Mix together the flour, baking powder, and salt. Add the dry ingredients to the creamed mixture alternately with the milk, mixing until smooth and fluffy. Fold in the cranberries.

5. Divide the batter between the muffin cups, filling each one almost full. Mix together the sugar and nutmeg for the topping and sprinkle generously over the muffins. Bake until puffed, light golden brown, and a toothpick inserted into the center of a muffin comes out clean, about 25 minutes. Serve muffins warm or at room temperature.

Enjoy!

Wednesday, December 24, 2008

Happy Holidays!


Happy Holidays to my readers out there! May your Christmases and Hanukkahs be merry and full of good food.

Like always, make sure you come home with a new recipe to share!

Enjoy!

Monday, December 22, 2008

Seeking: A Few Good Muffin Recipes


I received my first ever muffin pan last night for Hanukkah, and I'm really excited about it. Unfortunately, my cookbooks are quite lacking in muffin recipes. If anyone out there has one or two that they really love, I would be grateful if you wanted to pass it on. Email beetsandbonbons@hotmail.com and I'll get it up on the site right away!

Friday, December 19, 2008

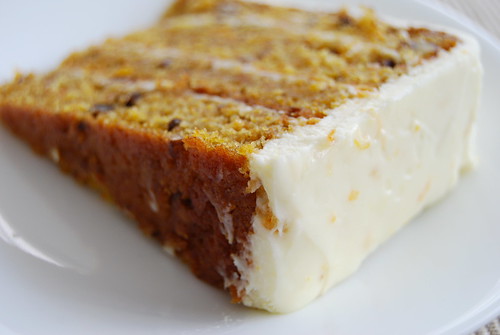
Elyssa's Secret Carrot Cake

I love secrets. And I'm usually pretty good at keeping them. But, when I get the "green light" - watch out world! Especially when it comes to recipes. We all have our coveted family recipes and our secret ingredients that we can't live without. This one comes from Elyssa, and it sounds like a real time saver, particularly for people like me who are not so adept at baking.
I have decided to share my "secret" carrot cake recipe with the world. This cake has become a major hit among my friends and I'm pretty sure I get invited to parties and BBQs based only on this cake.

Why is it a secret? Because it comes from a cook book called "The Cake Mix Doctor." That's right...cake mix. (I can already hear my Mom saying tsk tsk). But I'm a busy woman. Sometimes I need some help...and you might as well be in on the secret. You would never know that cake mix was used in this recipe, mostly because of all the "real" ingredients like the fresh carrots and the homemade frosting. Enjoy!

Carrot Cake with Cream Cheese Frosting

Serves: 16

Prep Time: 10 minutes

Baking Time: 30-35 minutes

Assembly Time: 15 minutes


Ingredients
  • Solid vegetable shortening for greasing the pans or Pam spray
  • Flour for dusting the pans
  • 1 package (3.4 ounces) plain yellow cake mix
  • 1 package (3.4 ounces) vanilla instant pudding mix
  • 2/3 cup fresh orange juice
  • 1/2 cup vegetable oil
  • 4 large eggs
  • 2 teaspoons ground cinnamon
  • 3 cups grated carrots--about 5 medium carrots (if you own a food processor do yourself a favor and use it to grate the carrots. Otherwise a box cheese grater works well)
  • 1/2 cup raisins
  • 1/2 cup chopped walnuts
1. Place a rack in the center of the oven and preheat the over to 350 degrees. Generously grease two 9-inch round cake pans with vegetable shortening or Pam spray. Dust with flour, then shake out the excess flour. Sent the pans aside.

2. Place the cake mix, pudding mix, orange juice, oil, eggs, and cinnamon in a large bowl. Blend with an electric mixed on low speed for 1 minute. Stop the machine and scrape down the sides of the bowl with a rubber spatula. Increase the mixed speed to medium and beat 2 minutes more, scrapping the sides down again if needed. The batter should look thick and well blended. Gently fold in the carrots, raisins, and nuts with a rubber spatula. Divide the batter between the prepared pans, smoothing it out with the rubber spatula. Place the pans in the oven side by side.


3. Bake the cakes until they are golden brown and spring back when lightly pressed with your finger, 30-35 minutes. Remove the pans from the over and place on wire racks to cool for 10 minutes. Run a dinner knife around the edges of each layer and invert each onto a rack, then invert each again onto another rack so that the cakes are right side up. Allow them to cool completely, 30 minutes more.


4. Prepare frosting (see below).


5. Place one cake layer right side up on a serving platter. Spread the top with frosting. Place the second layer, right side up, on top of the first layer and frost the top and sides of the cake with clean, smooth strokes.

6. Place this cake, uncovered, in the fridge until the frosting sets, 20 minutes. Cover the cake with waxed paper and store in the fridge for up to 1 week.


Cream Cheese Frosting


Ingredients
  • 1 package (8 ounces) cream cheese, at room temperature
  • 8 tablespoons (1 stick) butter, at room temperature
  • 3 3/4 cups confectioners' sugar, sifted
  • 1 teaspoon pure vanilla extract
1. Place the cream cheese and butter in a large mixing bowl. Blend with an electric mixer on low speed until combined, 30 seconds. Stop the machine. Add the confectioners' sugar a bit at a time, blending with mixer on low speed until the sugar is well incorporated, 1 minute. Add the vanilla, then increase the mixed speed to medium and blend the frosting until fluffy, 1 minute more.

2. Use at once to frost the top and sides of the cake.

Sounds delicious. Thanks, Elyssa! Enjoy, everyone!

Thursday, December 18, 2008

Old Fashioned Apple Crisp

I'm really holding on to Fall. I hear about snow in the Mid-west and I know it is coming here soon. I can't help but bring out this recipe a few more times before it is too late. Of course, the apples are best picked yourself on a gorgeous Fall afternoon, but when the temperatures drop too low, the grocery store will just have to do.

This recipe comes from the Barefoot Contessa Parties! book. It's the oats that really make the dish!

Old Fashioned Apple Crisp

  • 5 pounds McIntosh or Macoun apples
  • Grated zest of 1 orange
  • Grated zest of 1 lemon
  • 2 tablespoons freshly squeezed orange juice
  • 2 tablespoons freshly squeezed lemon juice
  • 1/2 cup granulated sugar
  • 2 teaspoons ground cinnamon
  • 1 teaspoon ground nutmeg
  • 1 1/2 cups flour
  • 3/4 cup granulated sugar
  • 3/4 cup light brown sugar, packed
  • 1/2 teaspoon kosher salt
  • 1 cup oatmeal
  • 1/2 pound cold unsalted butter, diced

Preheat the oven to 350 degrees F. Butter a 9 by 14 by 2-inch oval baking dish.

Peel, core, and cut the apples into large wedges. Combine the apples with the zests, juices, sugar, and spices. Pour into the dish.

To make the topping, combine the flour, sugars, salt, oatmeal, and cold butter in the bowl of an electric mixer fitted with the paddle attachment. Mix on low speed until the mixture is crumbly and the butter is the size of peas. Scatter evenly over the apples.

Place the crisp on a sheet pan and bake for 1 hour until the top is brown and the apples are bubbly. Serve warm.


Enjoy!

Thursday, December 11, 2008

Wild Mushroom Crostini


Wow. I was so thrilled to log on today to see that the blog had received several comments and a few more recipes to post!

This one comes from Elyssa, who I think did one of the coolest things and traveled with her mother to Provence for a week of cooking classes. Lucky me, we're in the same book club, and I got to sample her new cooking talents during our summer discussion! Delicious!

About the Wild Mushroom Crostini, Elyssa writes:

I made this appetizer for Thanksgiving and everyone loved it! It's probably going to become my new "go to" party appetizer. The flavors are delicious and simple. Some of the mushrooms can be pricey---I'm sure this recipe would work fine if you substituted the more expensive mushrooms for cheaper ones. The other nice thing is you can make a lot of the steps in advance. Bon Appetit!
Wild Mushroom Crostini

Yield: Makes 36
  • 36 1/3-inch-thick baguette slices
  • 2 tablespoons olive oil
  • 1/3 cup chopped shallots
  • 2 1/4 cups chopped oyster mushrooms
  • 2 1/4 cups chopped stemmed shiitake mushrooms (about 6 ounces)
  • 1 1/4 cups chopped chanterelle mushrooms (about 4 ounces)
  • 1 garlic clove, minced
  • 1/4 cup whipping cream
  • 1 teaspoon minced fresh rosemary
  • 1/2 teaspoon grated lemon peel
  • 1 cup grated Fontina cheese
  • 1/2 cup freshly grated Parmesan cheese (about 1 3/4 ounces)
Preheat oven to 375°F. Arrange baguette slices on rimmed baking sheet. Toast in oven until golden, about 9 minutes. Cool. (Can be prepared 2 days ahead. Store in airtight container at room temperature.)

Heat oil in large skillet over medium-high heat. Add shallots; sauté 1 minute. Add all mushrooms; sauté until beginning to brown, about 6 minutes. Stir in garlic; sauté 1 minute. Remove from heat. Stir in cream, rosemary, and lemon peel. Season with salt and pepper. Cool. Mix in both cheeses. (Can be made 2 days ahead. Cover and refrigerate.)

Preheat broiler. Top each toast with about 1 tablespoon mushroom topping. Place on 2 rimmed baking sheets. Working in batches, broil until cheese is melted and begins to brown, watching closely to prevent burning, about 3 minutes. Transfer to serving platter. Serve warm.

I really can't wait to try this recipe. I love all things mushroom and completely appreciate a recipe that can be made in stages, and in advance. Sounds like it would be perfect for a New Year's Eve party.

Enjoy!

Wednesday, December 10, 2008

St. Patrick's Day Brownies


Our forecast today is unseasonably warm and very very rainy. The kind of day that you just want to skip out on work, hole up in the apartment, watch movies and eat junk food. Although we're a few months away from St. Patrick's Day, today may have that rainy March kind of feel to it. And what better way to find satisfaction on an otherwise miserable day but through a Luck 'O the Irish Brownie? This one comes from my friend Jess (who also makes a mean lemon chicken - her Thanksgiving tradition). Sounds delicious and I can't wait to make them myself!

St. Patrick's Day Brownies
  • 4 (1 ounce) squares unsweetened chocolate
  • 1 cup margarine, softened
  • 2 cups white sugar
  • 3 eggs
  • 2 1/2 teaspoons vanilla extract
  • 1 cup all-purpose flour
  • 1/2 cup butter, softened
  • 4 cups confectioners' sugar
  • 2 tablespoons milk, or as needed
  • 1 1/2 teaspoons peppermint extract
  • 6 drops green food coloring
  • 1 1/3 cups semisweet chocolate chips
  • 6 tablespoons butter
  • 1 tablespoon vanilla extract
Preheat the oven to 350 degrees F (175 degrees C). Grease a 9x13 inch baking dish.

Melt the unsweetened chocolate in a cup or small bowl in the microwave. Stir at 15 second intervals until chocolate is smooth. Allow to cool slightly. Transfer to a large bowl, and stir in the margarine and sugar until smooth. Beat in the eggs one at a time, then stir in the vanilla. Stir in the flour just until blended. Pour the batter into the prepared dish and spread evenly.


Bake in the preheated oven until the surface appears dry and the sides are beginning to pull away from the edges of the pan, 20 to 25 minutes. The brownies may look more like cake and may jiggle slightly in the center- this is normal. Remove from the oven and cool in the pan set over a wire rack.


To make the middle layer, beat 1/2 cup of butter with confectioners' sugar in a large bowl using an electric mixer. Add milk as needed to get a spreadable consistency. Stir in the peppermint extract and green food coloring. Spread this over the cooled pan of brownies. Refrigerate for 30 minutes


In a microwave-safe bowl, microwave chocolate chips with the butter until melted. Stir every 20 seconds until chocolate is smooth. Stir in vanilla and then pour over the chilled brownies and quickly spread to cover the surface. Cool again until firm, about 10 minutes, then cut into squares and serve.


Yum! Enjoy!

Tuesday, December 9, 2008

Medallions of Pork with Pear Sauce


I pulled another one out of the vault last night. In fact, I had only made the recipe once before, and it had to be about 7 years ago. Normally, pork medallions are something that I don't just have on hand, but recently getting tired of the same rotation of chicken, salmon, and steak, we had to branch out.

I had forgotten how good this recipe is. Adding a simple pan sauce of caramelized pear and ginger to the pork transforms a meat that I typically find just so-so, into quite a fancy entree.

Medallions of Pork with Pear Sauce
  • 2 tablespoons vegetable oil
  • 4 1/2-inch-thick boneless pork loin chops
  • Dried rubbed sage
  • All purpose flour
  • 2 pears, peeled, cored, thinly sliced (about 1 pound)
  • 1/3 cup dry white wine
  • 2 tablespoons sugar
  • 2 tablespoons chopped crystallized ginger

Heat oil in heavy large skillet over medium heat. Season pork with dried sage, salt and pepper. Coat pork with flour; shake off excess. Add pork to skillet and sauté until brown, about 3 minutes per side. Transfer to platter.

Drain fat from skillet. Add pears and sauté over medium heat 2 minutes. Stir in wine, sugar and ginger, scraping up any browned bits. Increase heat to high and boil until pears are tender and syrup is thick, about 5 minutes. Return pork and any accumulated juices to skillet. Simmer just until cooked through, about 1 minute. Season to taste with salt and pepper. Arrange pork on plates. Spoon sauce over and serve.

Note: last night I substituted powdered ginger for the crystallized and it worked just as well.

Enjoy!

Friday, December 5, 2008

Provencal Chicken Stew

As is my routine, I woke up this morning and checked the weather forecast. It's gonna be a cold one! Highs not even getting out of the 30s this weekend. Immediately, I thought it is time to bring out the slow cooker. Here is one of our favorites - and very easy to make (what isn't with the slow cooker?). It is a simple recipe, combining basic ingredients, and we find it is good over rice, to absorb the sauce. The taste combinations of the chicken, kalamata olives, tomatoes and basil is delicious and will make you yearn for the fresh air and rugged landscape of Provence.

Provencal Chicken Stew
  • 3/4 cup plus 2 tablespoons all-purpose flour
  • 1 teaspoon salt
  • 1 chicken, cut into serving pieces and skinned
  • 1/4 cup olive oil
  • 1 yellow onion, finely chopped
  • 1 clove garlic, minced
  • 1/2 cup dry white wine
  • 1 (14 1/2-ounce) can crushed tomatoes
  • Freshly ground black pepper
  • 1/4 cup chopped fresh parsley, for garnish
  • 1/4 cup fresh basil leaves, cut into chiffonade, for garnish
  • 1 cup black Nyons or kalamata olives, for garnish

Combine the 3/4 cup flour and the salt in a resealable plastic bag. Add the chicken to the bag, several pieces at a time, and shake to coat completely.

Heat a large sauté pan over medium-high heat and add the oil. Add the chicken and cook, turning once, for 8 to 10 minutes, until browned on both sides. Using tongs, transfer to paper towels to drain, then arrange in the slow cooker.

Set the sauté pan over medium-high heat and add the onion and the 2 tablespoons flour. Sauté, stirring frequently, for 10 minutes, or until lightly browned. Add the garlic and stir for 2 to 3 minutes. Add the wine and stir to scrape up the browned bits from the bottom of the pan. Increase the heat to high and add the tomatoes and pepper to taste. Cook, stirring frequently, for 10 to 15 minutes, until some of the tomato liquid evaporates.

Pour the onion mixture over the chicken in the slow cooker. Cover and cook on low for 3 to 8 hours, until the chicken is tender. At 3 to 4 hours, the chicken will still be firm and hold its shape. At 6 to 8 hours, the meat will be falling off the bone.

Divide the chicken among dinner plates and garnish with the parsley, basil, and olives. Serve immediately.

Enjoy!


Tuesday, December 2, 2008

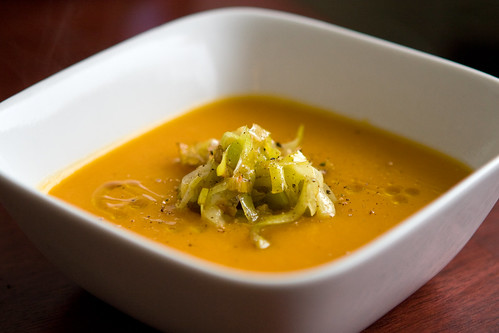
Butternut Squash and Apple Soup


Tis the season to be jolly, and by jolly I mean full of heavy holiday dishes. I hope everyone survived Thanksgiving. I, for one, filled up on appetizers and now, while everyone else is begrudgingly finishing up their leftovers, I wish I had had more turkey.

So, now we look toward the next set of holidays, gearing up for more big meals. What is your family's traditional holiday feast? Although I grew up Jewish, I also celebrated Christmas on my father's side. His mother, a traditional Italian, made lasagna and meatballs for Christmas dinner. While basic, I look forward to it every year!

Even though it is now officially December, I'm not quite ready to give up on Fall yet, and there is probably not much time to make another one of my favorite dishes, so I will happily share it with you. Butternut squash and apple soup, recipe courtesy of Ina Garten, the Barefoot Contessa.

Butternut Squash and Apple Soup
  • 2 tablespoons unsalted butter
  • 2 tablespoons good olive oil
  • 4 cups chopped yellow onions (3 large)
  • 2 tablespoons mild curry powder
  • 5 pounds butternut squash (2 large)
  • 1 1/2 pounds sweet apples, such as McIntosh (4 apples)
  • 2 teaspoons kosher salt
  • 1/2 teaspoon freshly ground black pepper
  • 2 cups water
  • 2 cups good apple cider or juice

Warm the butter, olive oil, onions, and curry powder in a large stockpot uncovered over low heat for 15 to 20 minutes, until the onions are tender. Stir occasionally, scraping the bottom of the pot.

Peel the squash, cut in half, and remove the seeds. Cut the squash into chunks. Peel, quarter, and core the apples. Cut into chunks.

Add the squash, apples, salt, pepper, and 2 cups of water to the pot. Bring to a boil, cover, and cook over low heat for 30 to 40 minutes, until the squash and apples are very soft. Process the soup through a food mill fitted with a large blade, or puree it coarsely in the bowl of a food processor fitted with a steel blade.

Pour the soup back into the pot. Add the apple cider or juice and enough water to make the soup the consistency you like; it should be slightly sweet and quite thick. Check the salt and pepper and serve hot.

Enjoy!

Blog Widget by LinkWithin